So, as mentioned in the Hello World post, I've recently built a vaporizer
that is supposed to be a clone of the popular JUUL.
It accepts regular JUUL pods (and now MYLE pods as well).
Why?
Well, why did I build it?
So my friend came up to me a few weeks ago, frantically, saying, "BRIAN! I need your help.
I lost my vape. Could you engineer me a new one?!?!"
He ended up buying a new one soon after, but I said, "Challenge accepted!"
(Plus I thought it'd be a fun little quick project to do)
(Kinda) Reversing the JUUL
So I had some ideas in my head. I definitely did not want to make an entire vaporizer from scratch, and I also wanted it to fit regular pods.
Vaporizers have 3 major parts: the power supply, the coil, and the tank. The power supply produces the voltage and current necessary. The coil receives the power from the supply and heats up. The tank holds the liquid, which vaporizes from the coil's heat and is then inhaled by the user.

Ok, I tried. I tried to find a good diagram that depicts something like the above diagram,
but couldn't... So I drew my own.
Honestly, now that I look at it, maybe the other diagrams were better...
Well, you're stuck with this.
The JUUL has (mainly) two parts: the power supply (that's the long silver/black/red meta part) and the pod (that's replaceable and contains the "e-juice" that gets vaporized)
Here's a picture of a pod:

Conveniently, the pods contain the coil as well, which means I won't have to deal with any of the coil or the liquids. I've got a hold of a few used pods and took them apart. It's fairly simple; submerged in the ink is an assembly of a coil wrapped around some wick that pulls the liquid into the coil.
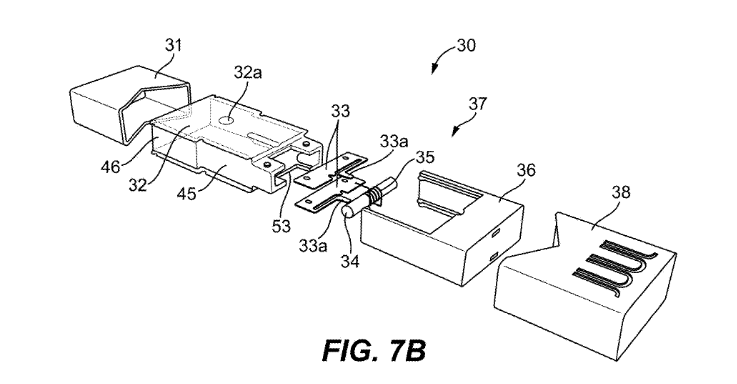
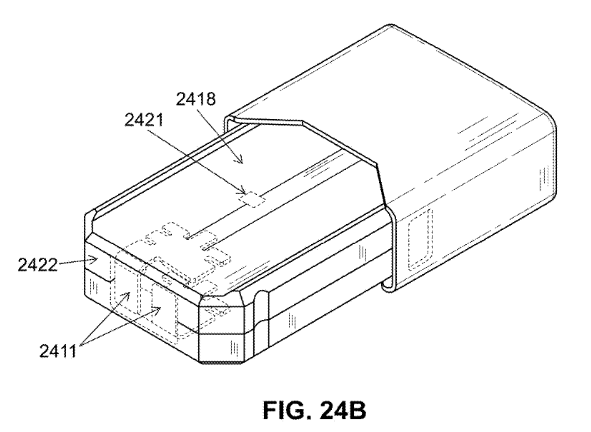
Firstly, trying to figure out how the JUUL works or does the vaporization thingy, I did some research. It didn't take long at all until I found JUUL's patents page. The first one listed (US9215895B2) actually has some cool data and graphs. Most of the other ones are about their "Vaporization Device Systems and Methods" and different versions of it, but I found US10045568B2 the most useful. It looks like its got the most recent form for the pod.

Now that's a proper diagram. I don't know how to properly cite a source for a diagram from a patent.

Also from the same patent. This diagram looks most like the actual JUUL pod.
I also don't know how to properly size images either.
On the bottom of the pod are the two contacts that the power pack supplies the power through to the coil inside the pod. There doesn't seem to be any kind of circuitry besides that inside the pods themselves.
In the earlier versions of the JUUL, seen in the other patents, it seems like they were planning to add a small microcontroller of some kinds inside the pod for smart operations and maybe DRM. Probably DRM. Not really DRM, but like, similar. Maybe I should've actually read the patents. They likely ditched the idea since it would make the pods more costly.
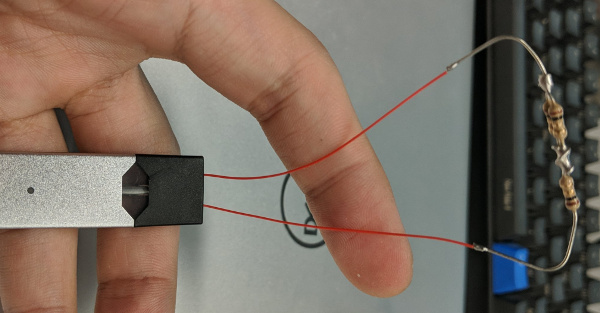
Anyways, back on topic. All I have to do was mimic the JUUL power supply. To do this, I first need to figure out how much power it provides. To do this, I need to know the voltage and current. To do that I wanted to mimic the pod so that I can plug it into the JUUL and measure the output. So I did. The resistance across the coil measured through the exposed contacts was about 1.6 ohms.
Also I've noticed that the JUUL has a short circuit protection. Which is generally a smart idea, especially for consumer devices and for small gadgets that people put inside pockets and throw around. When the two pins inside the JUUL are shorted, the LED blinks orange a few times. Okay.
So that next step was for me to connect 1.6 ohms across the contacts on the JUUL and measure the output. I've also noticed that when a pod was connected, the LED blinks white once. It must have some measuring circuit to know when there is a pod inserted. I gutted out the said used JUUL pods, and after soaking their disassembled parts in alcohol for a few minutes and cleaning them, reassembled it, only without the coil and two resistors in its place to make ~1.5 ohms.
Oh man, I'm writing this like it's a lab report.

So I did that.
And it worked.
When I plugged it in, the light lit up once, which indicates that a pod had been plugged in.
I simulated a "pull" and the resistors got hot. I also hooked up a voltmeter across the
resistors during it and it measured about 3.3 volts.
Great! I have the voltage, and all I need now is the current. I tried to measure the current that the resistors were drawing. I started by hooking up an ammeter in series, but that messes with the resistance of the load, so that didn't work. For about a good 30 minutes, I couldn't figure it out...
And then I slammed my head on the table. OHM'S LAW! How could I forget. I already had all the information to get the current draw. I have the resistance and the voltage across it. Applying Ohm's law, 3.3V / 1.6 Ohms gives me a little over 2 amps. Wow, this thing consumes over 6 Watts of power! Makes a little sense since all that heat energy is being used to vaporize the liquids.
This is kinda getting long and I'm tired. I don't know. Maybe I'll leave this here for now. Come back for part two for power supply design and possibly prototyping and building it.
By the way, the finished (or is it?) design files and code can be found here. I've made a page for some of the side projects I do. They're all gonna be under the page Mechanical and Electrical Industry Research Labs aka ME-IRL.
Thanks for reading.
73,
-Brian